I am quickly discovering a pattern when it comes to working on this Willys => nothing is as simple as it first seems.
For example......
For the last month, with the help of the Master Mechanic, we have been trying to remove the front bumper of the 1957 Willys Jeep. It is a custom fabrication job, I want to remove it, clean it up and remount it on the 1960 Willys Jeep.
Simple.
Not really.
So after using a cutting torch and a Sawzall, 2 very powerful tools the bumper is still attached to the 1957 Willys, with no end in sight. A month has gone by, and it doesn't even seem loose, or ready to give up the fight. The picture is of one of several blades that met it's end at the hands of this fabricated bumper. One thing is for certain, the people who attached this bumper had made sure it would never come off.
So what is the plan? Not sure, a stronger blade, more torch cutting perhaps. But this has reminded me that the restoration process often has these "darker sides" to it. It is not always as simple as remove, replace, refinish. Sometimes the "remove" part does not want to cooperate.
Tuesday, December 1, 2009
Saturday, October 31, 2009
Wakefield Willys Update 2.7
So it has been a month, a quiet month. But a few things are in the works.
Today, we (me & the master mechanic) began to cut and remove the front bumper of the 1957 Willys Jeep. We are going to cut it off with a torch and bring it inside the shelter to get it ready to be reinstalled on the 1960 Willys.
We also played with the mig welder for the first time, a key tool to getting the willys tub and misc parts up to spec. Alot of work to get it working, but it seemed to at the end doing what we wanted it to do.
Been doing some shopping looking for body parts for the Jeep. That will be a big focus of next year.
Thats about it. Project has slowed down, but not all together.
Tuesday, September 29, 2009
Wakefield Willys Update 2.6
From the previous post, you can see a before and after picture of the engine. I wish I had taken a better pict at the beginning. My mistake.
In the "before shot", we had a leaking carb, and everything was coated in PA mud. That is good for the frame, but not the engine.
Now, in the "after shot" we see the engine slowly getting cleaned up. This summer, I have cleaned the oil cap, air cleaner, carb and most recently the oil filter assembly.
Boy was that work! I am not anxious to do that again, it was like a jigsaw puzzle, and make sure you put it back in a certain order or you will find yourself repeating steps.
Quite the patience builder. Anyway, gave me a chance to change the oil, and get it ready for Winter. Looks good.
Sunday, September 20, 2009
Wakefield Willys Update 2.5
The air is turning colder, had our first 30 degree reading overnight. That means we are inching closer and closer to the season when we can't paint. And not painting means no body and frame work. Yes, we could do some welding, but I haven't found a welder yet. But certainly we will need to focus on other projects.
So we are trying to get some last minute restoration projects in. We have worked on both bumpers, sanding them and painting / undercoating them. Looks good.
We have done some minor gas tank repair, without success. We need a new tank, but I am not sure I am going to replace the one under the driver seat. Not exactly the safest place to put it.
Couple odds and ends, cleaning up some parts that are laying around that could be used in the project, or sold. The new wire bush attachment on the grinder is making this a lot more fun, and easier.
That is about it. chuggin along.....
Friday, September 4, 2009
Rim Swap
This was what I mentioned in my last post.
These rims are from the 1957 Willys, now freshly painted and mounted on the 1960 Willys. I like this look, not that we are getting rid of the "mudders" But it looks authentic. Runs and drives great. Going to play with it this weekend.
BTW - These are 16 inch rims, and if you have 15 inch rims, you can not do the 11 inch brake drum swap. In case your wondering.
Wednesday, September 2, 2009
Wakefield Willys Update 2.4
Just want a give a quick update.....
We are in the middle of the "rim swap" Taking the rims off of the 1957 Willys, wire brushing, priming and painting black. This is to get rid of rust, as well as preserve the original rims.
Then we put them on the 1960 Willys and put the "mudders" on the 1957. If your confused, sorry. You will understand when we are all done.
I have been hand wire brushing, which is fine. Sometimes to get in tight spots, it is your only choice. For the rest, I used a drill with a wirebrush attachment. Worked fine, and did one set of rims this way.
But for a few $$ at the Hardware store, I picked up this wire brush attachment for the angle grinder. This is soooooooo cool. And easy to use, way easier. And it really does a good job getting the old paint off. Look at the picture, that rim used to be green and yellow. And I barely did anything! Very slick.
Tuesday, August 25, 2009
Upcoming Projects
With the Brake Work behind us, we have the chance to catch our breath and begin thinking of new items on the docket.
I am still working on the list, but here is what we got so far....
Project List:
Fall 2009
Removal of Snow Plow Equipment from Frame
Frame => Wire brush & Undercoating
1957 Rims => Wire Brush & Prime
Front Bumper Design
Tub Prep for Body Work
Winter 2009-2010
Replace Manifold Gaskets
Change Oil & Filter
Oil Filter Assembly => Sand, Prime, Paint
Electrical Work Prep
Front Bumper Assembly
Tub Body Work
Spring 2010
Tub Body Work
New Tailgate
Paint Willys Jeep ( Fenders, Grill, Hood, Tailgate)
Windshield Swap
Removal of Top
Monday, August 17, 2009
Willys Jeep CJ-5 11 inch Drum Brakes Swap
Early CJ-5 11 inch Drum Brakes Swap
(Parts List & Equipment List)
by Jason Wakefield, August 2009
I have read several article on the subject, which have all been helpful. But I noticed some gaps in the information, particularly the parts list and what equipment you might need. So I decided to write an article for my own sanity and maybe for someone else that may partake on this quest. I am glad I did the swap, and have no regrets. I think anyone wanting to drive their early CJ-5 around should consider upgrading the brakes.
Simple Explanation
To convert the original 9 inch drum brakes of of an early CJ-5 to 11 inch drum brakes from a later Jeep model. I have a 1960 CJ-5 and this should work with CJ5 through 1971, and some CJ-3B Models.
Parts List:
4 11 inch back plates & brake drums ( 1972-1976 Jeep CJ-5, 1967-1970 Jeep Wagoneer, Jeep Truck, you can also find after market parts on websites like 4wd.com)
(BTW – You can continue to use your original hubs, they fit with these brake drums)
2 Sets of 11 inch brake shoes
2 Hardware Kits for installing brake shoes (springs, pins, etc....)
2 Left Side self adjustment kits
2 Right Side self adjustment kits
4 Wheel Cylinders ( all 4 are different)
8 5/16 bolts (½ inch length) for mounting the wheel cylinders to the backplates
8 5/16 locking washers for mounting the wheel cylinders ( looks like a star)
8 Wheel Cylinder Links ( your 9 inch drums do not have these, but your 11 inch drums do)
4 Brake Shoe Retaining Washer ( Diamond Shape, attaches top of the backplate. Mine were already attached on the donor backplates.)
2 12 inch rubber brake hoses for the front.
2 30 inch 3/16 brake line ( rear brakes)
1 12 inch ¼ brake line (front left)
1 40-50 inch ¼ brake line (front right)
1 30 inch ¼ brake line (Master Cylinder, could be optional)
2 3/16 to ¼ brake line adapter
1 Rubber Rear Brake Hose (Looked fine on the outside, but mine was junk, best to replace)
2 inch long collar pins ( you need 2 new ones to replace the ones you pull out of the rear axle)
Brake Fluid
Where to find Parts
These parts can be found almost everywhere, although some were harder to find that others.
For me, the break down was as follows:
Backplates, Drums ( donor parts from a Jeep Farm), Brake Shoes, Rubber Hoses, Wheel Cylinders, Hardware (4wd.com), Self Adjuster Kits (Auto Zone, can be bought at 4wd.com), Bolts & Washers ( Local Hardware Store), brake fluid, grease, brake lines, adapters (Local Auto Parts Stores), Wheel Cylinder Links ( Jeep Dealership)
Many of these parts took time and shipping to get to me. So don't run to the Auto Parts store hoping all of this is in stock, it probably won't be. The hardest part to find was the Cylinder Links. Let me explain.
How I found the Wheel Cylinder Links
When visiting a Jeep Dealership, surprise surprise, their computers are not exactly equipped to find vintage parts for your Jeep. It took some effort on my part, and the parts person to find the Cylinder Links. We look through diagrams of Wranglers, Wagoneers and finally found it by looking at XJ Cherokees from 1985. In my case, he happened to have 2 of them, and comparing with one that was left over from my backplates, we confirmed it was the same part.
So my advice here is simple. If you pick up donor backplates, do not immediately throw out the hardware and parts attached. You may need them as a reference. It was extremely helpful to have a Cylinder Link in my hand when looking for this part.
The Part Number at the Jeep Dealership was # J0048331
Left & Right Backplates, Which is Which?
When I picked up my backplates, 2 were left, and 2 were right, but which was which? It is very simple.
Looking at the photo, you can see a RECTANGULAR NOTCH at the bottom of the backplate, and if you notice, it is slightly off center. When looking at them, the NOTCH will be either slightly to the left or slightly to the right. The NOTCH is for the star adjuster on your brake drums.
Backplates with the NOTCH Slightly to the RIGHT (LEFT SIDE, DRIVER SIDE)
Backplates with the NOTCH Slightly to the LEFT (RIGHT SIDE, PASSENGER SIDE)
SIMPLE!
Brake Lines
This was one of the gaps in the information I mentioned at the beginning. It is not a big deal, brake lines are usually easy to come by. But I thought I would give a brief explanation of why you are buying new brake lines.
Rear brake lines are 3/16 in diameter, and connect directly into the wheel cylinders. On the old Wheel Cylinders, they go straight in, but the new wheel cylinders connect at a 45 degree angle. Not a big deal, but that means either bending the original lines or just installing new ones. I chose to install new ones.
The front lines are more complicated. The original lines are 3/16 lines, but that is a problem for the conversion. The 11 inch wheel cylinders and rubber hoses that come out connect to a ¼ inch brake line. So what do you do? Well obviously you need to connect ¼ brake lines, but then you get to the junction box on the front left fender and it is a 3/16 connection.
If you do not know what I am talking about, there is a junction box where the Master Cylinder Brake Line comes in from the top, and splits 3 ways. One line goes to the back axle, and the other 2 go to the front brake lines. But those 2 front lines are 3/16, and you need ¼ to connect. My solution, use adapters at the junction box to connect your ¼ lines into a 3/16 opening on the junction box.
OPTIONAL PARTS & EQUIPMENT LIST
2 1/16 Inch Spindle Nut Socket ( Highly recommended, for front axle)
Hub Puller ( For the rear axle, borrowed from Auto Zone, worked great!)
Basic Brake Tools
3ft (approx.) piece of wood with ¾ hole at the end (could be a 1x2, 1x4, nothing too big)
Punch, Hammer ( for getting bearings out, hammer is useful in get drums and hubs off)
4 Bearings for front hubs2 Grease Covers for hub
New Studs & Lugs
Axle Grease
Spindle Nut Socket
Yes, people are able to get the bolt out with a chisel and hammer, but I get impatient. Having the right tool makes this job a snap. I found it at 4wd.com. For a few $$$, it seemed worth it.
Piece of Wood
So you have the Willys Jeep up on Jack Stands and you start yanking on one of the axles and it spins. And you find there is no way to get any grip. Solution => Attach a piece of wood to one of the studs on the other side of the Willys, and wedge it up in the fender so the hub can not move. Worked perfectly. Does not have to be 3 ft, measure to make sure, and use any old scrap wood. Worked great for me.
Removal of Rear Hubs
A Hub Puller was absolutely necessary, no way to get around this. BEWARE! CAUTION! When you build up the tension on that rear hub, it will explode of the axle. One flew 3 ft in the air, and the other over a foot. Stand to the side when you are turning the hub puller and hitting the hub with a hammer. This was very exciting, but could have been painful.
Front Bearings & Studs
You have them off and you can easily replace them. Why not? If you are going to restore, mine as well take care of this while it is off. The inner and outer bearings are the same, took 10 minutes to do, and looked great. It is also a good time to replace studs if they look bad and beat up. Again, it is easy to do and you have it off the Jeep.
Conclusion
If there are parts and equipment I failed to mention that others found necessary and useful, let me know. My goal was to create a list that would be a comprehensive as possible. I like having all my parts and equipment assembled before moving forward. Enjoy the Quest, it will be worth it!
Sunday, August 16, 2009
Contributers to the Brake Project
I have spent some serious $$$ on these brakes, doubling the value of the Jeep for sure. Here are the contributors to the Project:
4wd.com
AutoZone
Local Jeep Dealership
Local Hardware Stores
Pep Boys
Sears
Tractor Supply
4wd.com
AutoZone
Local Jeep Dealership
Local Hardware Stores
Pep Boys
Sears
Tractor Supply
Saturday, August 15, 2009
Happy Anniversary! Year 2 begins with a Bang
I realized today, that this same day last year I picked up the first 2 chassis in Upstate NY. Since then it has been a lot of work. A 3rd chassis had been purchased which is now our main focus.
After 365 Days, we have a running Willys Jeep with working brakes. Doesn't sound like much, but if you consider where we were last year, it is some decent progress. I can only imagine what the next year will bring.
In the picture, the 1960 Willys Jeep CJ5 out of it's shelter for the 1st time in months. Enjoying a hot summer day. Glad we can finally drive it and stop.
Progress.
Sticky Widget X 2
The brakes are done, some adjustment is needed, but they are done.
But there are last 2 instances in the project that brought frustration. I call them Sticky Widgets.
1st Sticky Widget: Rear Rubber Hose
So late Friday Night, after everything was installed, we began bleeding the brakes. But there was a problem. The rears were not bleeding. Fronts fine, the rears, nothing. Frustrating.
After some investigation, it was determined that the rear rubber hose was to blame. Fortunately, I had ordered one, and once installed, we were able to bleed all the brakes.
2nd Sticky Widget: Studs
It is not actually their fault, but they would not "sit" properly in the hub. After several attempts, I called the Master Mechanic, the suggestion was made => Aluminum Foil. Wrap the studs with the foil. As silly as that sounds, it worked, and the last wheel was put on.
2 very frustrating events, but they were both overcome in the end. To say I am relieved is an understatement.
Friday, August 14, 2009
Brake Work Update
For almost the entire summer, this poor Jeep has been confined to the make shift garage in the backyard.
The reason was simple, no brakes, no fun. It has been on jack stands the entire time. Had to be, when you take apart the brakes, you need to remove the hubs. No hubs, no tires.
But there is a glimmer of hope for this old Willys. If all goes well this Friday, the brakes will be done. Installed, working. And if they are working, this Willys will hopefully be able to come out and play in a nearby field. We shall see. Stay tuned.......
Monday, August 10, 2009
The Quest
About 30 seconds into assembling the first drum brake, we came across our biggest surprise as far as parts. With the wheel cylinder already mounted on the backplate and the backplate attached to the axle, all we needed was a wheel cylinder link.
A wheel cylinder link is what is pictured on the right, and it is placed between the brake shoe and the wheel cylinder. For reasons I can not explain, it did not come with any of the hardware that was purchased and so far no one sells it locally at Auto Zone and Pep Boys.
I have 3 of them, as they were left over from the hardware that was left on the donor backplates.
So, I am on a quest to find 5 more of these wheel cylinder links. If you are doing the 11 inch brake drum swap, make sure you secure these parts! 9 inch drum brakes do not have wheel cylinder links, so you need to find them with your 11 inch drum brakes. We can not assemble any more brake hardware until I find more wheel cylinder links.
My first stop on the quest is the local Jeep dealership. Then maybe a junkyard, and then.........who knows?
Sunday, August 9, 2009
Progress
The picture says it all. This picture was taken of the front left wheel, and as you can see, it has been reassembled. All it needs is a brake drum, some bolts, and a brake hose hooked up and it is ready to roll.
The hub has new bearings and new studs. We are setting aside the left turning lugs and studs. Nothing against them, but I am certain they will get torn off by an unaware mechanic with a pneumatic impact wrench.
1 down, 3 to go!
The hub has new bearings and new studs. We are setting aside the left turning lugs and studs. Nothing against them, but I am certain they will get torn off by an unaware mechanic with a pneumatic impact wrench.
1 down, 3 to go!
Wednesday, August 5, 2009
All it needs is a Master Cylinder.......
As a wise friend of mine said, if that is all in needed, he would have fixed himself. How true how true how true.........
I can tell you with certainty that the Willys Jeep has no brakes. And when I mean no brakes, I mean nothing. Other than a few brake lines running along the frame, there is nothing left to take off. Master cylinder, brake drums, back plates and all misc parts that make brakes work are either in the garbage or sitting on the floor of the work area. Quite literally, there is nothing left to remove.
That is good news, because from here on out, we will be rebuilding, instead of tearing down. The donor back plates are wirebrushed and painted and ready to be installed. Parts are being gathered and arriving daily. The brake drums are having the studs removed at a machine shop, so we can install brand new studs to attach to the wheels.
I am certain that as of this post, there will be more items to purchase, I already know I need some more studs. But all I can say is this, we are very close to rebuilding a brand new brake system for a Willys Jeep.
Monday, August 3, 2009
Innovation
So when working on brakes, and axles in general you have to figure out how to turn nuts and bolts while the axles are freely spinning. It can be a little annoying.
So in this picture, you see my solution. A wooden plank with a 3/4 hole in it to attach to a hub. It hits the fender and stops the rotation. Very simple, and does the trick.
With that solution, I was able to make great strides in the tear down process. Almost done with the tear down, and getting excited about the rebuild.
The most exciting part was pulling the rear hubs. They came off with a large bang and flew across the floor. Glad I knew to stand off to the side.
Saturday, August 1, 2009
Comparison of Drums
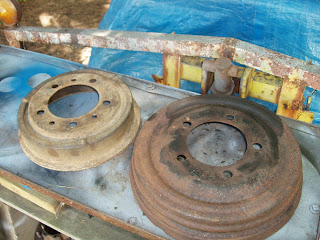
Wagoneer Brakes
So I have already mentioned we are doing a brake drum swap. We are converting the CJ-5 from 9 inch drum brakes to 11 inch drum brakes. A description of the conversion can be found here.
Anyhow, here are the donor parts. They came off a 1970's Jeep Wagoneer. They are back plates and brake drums. They are already turned, so we know they will work. So what needs to be done is to fix some of the stud bolts and sand blast the parts and maybe a little paint.
I am going to try and document this process, for my sanity and in case any one is reading.
Wednesday, July 29, 2009
Update on Brake Work
Picts will be coming soon, but basically the project has taken a turn into the 1970s. Let me explain.
The brakes on early CJ5 are based on a design from the 1940s, and most Willy owners agree that they are inadequate. If we simply replace existing parts, we will eventually have a "religious experience" while trying to stop to Jeep. I am all for religion, but not that kind of experience!
So, we are taking a brake design from the 1970s which should do the trick. We are replacing the 9 inch drums with 11 inch drums. Although I would love to introduce disc brakes, we would have to make further sacrifices that I am unwilling to make at this time. The traditional rims would have to be jettison, and I do want to keep the look of a 1957 Willys Jeep.
Anyhow, the parts are on order and I am going to pick up some brake drums and back plates in MA Thurs. / Fri. Hopefully this weekend, the transformation will begin!
Tuesday, July 14, 2009
Brakes Brakes Brakes
In reading articles on line, I am getting the quick impression that keeping the original 9 inch brakes is a bad idea. So many many folks have converted the brakes. Either to bigger drums, or disc brakes.
Here is an article on converting to disc
Here is an article on converting to 11 inch drums.
What to do?
The the costs go up and up and up.
Here is an article on converting to disc
Here is an article on converting to 11 inch drums.
What to do?
The the costs go up and up and up.
Tuesday, June 30, 2009
Wakefield Willys Update 2.3
Well, we have come to a halt on the brakes. Here is why.
I had bought the right parts for the project but soon discovered that somewhere along the way someone upgraded the front brakes. We compared the 1957 with the 1960 and the front brakes are different. They should be the same.
Now the upgrade was a good idea, so we have decided to keep the current set up. But that meant sending back parts and ordering new parts. The problem there was that the new parts are way more expensive. $200 more to be exact. Hence why we have stopped, no pun intended.
So the plan is to sell off unused parts on eBay and Craigslist and raise the $200 needed to get the correct upgrades. Hopefully we can get back on track very very soon.
Thursday, June 11, 2009
Wakefield Willys Update 2.2
Brakes.......
Started work on getting the brakes to work. Tore the floor boards out, removed the Master Cylinder and broke a brake line in the process. No surprise there.
More work tomorrow, but there is progress. The Willys continues little by little coming to life and being transformed into a rebuilt vehicle.
Started work on getting the brakes to work. Tore the floor boards out, removed the Master Cylinder and broke a brake line in the process. No surprise there.
More work tomorrow, but there is progress. The Willys continues little by little coming to life and being transformed into a rebuilt vehicle.
Saturday, May 16, 2009
Wakefield Willys Update 2.1
It's running! I set out to rebuild and clean the carburetor, and change the oil this Saturday. Surprisingly, the rebuild and cleaning was easy.
Until I turned it over and saw that I caused a hairline crack in the fuel line reattaching it to the carb. I thought I had really blown it and we were in trouble. And to boot, I could not get the oil plug off. Very frustrating.
Alas, our tech expert showed up, with tools to get the oil plug off and a bender to put in a new fuel line. After a few minutes we had it running! Who Hoo!
So after changing the oil, replacing a fuel line and rebuilding a carb, the Willys was running without any trouble.
Very very very good day
Wednesday, May 13, 2009
Weekend Plans
Hope to rebuild the carb, and change the oil. Hopefully simple projects that can ensure this Willys Project keeps running! Watched this video on youtube, read some articles and talked with our tech expert and think we are ready.
Ordered parts through www.4wd.com. They have a great vintage section. Looking forward to the weekend!
Saturday, April 25, 2009
Wakefield Willys Update 2.0
Today it is pushing 90 degrees, which is crazy. And the activity with the Willys Project has heated up as well. Here is what has happened this Spring so far:
Cargo Trailer equipped to haul a "Willys"
The "Bondo Jeep" was stripped, and it's chassis was sent to the scrap yard.
As mentioned, a 1960 Willys CJ5 purchased.
Now the 1960 Willys runs, but it needs the following changes:
Master Cylinder ( no brakes at the present moment)
Rebuild the Carburetor
Gasket for Manifold Exhaust
If we get these done, we will be in excellent shape. Drew is looking forward to take it out and have some fun with it.
Other items on the immediate list to do are to take the L-Head Engine out of the 1957 Willys, remove it's top and begin stripping it for teardown. Sell some parts that we will not be using, and make plans to remove the 1960 Willys Tub. It is a very exciting time, and we hope to make a lot of progress as the temps heat up.
Friday, April 17, 2009
New Addition: 1960 Cj-5 Willys
Yep, with Spring here we decided to get moving on the project. Pictures will follow, but here are the basic details.
Picked it up just south of Binghamton, NY in PA. Good frame, running F-Head and a so-so body. Had it running, but it needs some TLC. Plus a few gaskets and a master cylinder. A good start to getting it on the road.
Friday, February 27, 2009
Willys Serial Numbers
I have found this website helpful in determining serial numbers. Not sure if I have posted it before.
Wednesday, February 4, 2009
Willys Jeep's Winter Holiday
Nothing much is happening with the Willys Jeep mainly because the work space is a little cluttered.....with snow.
Like last winter, we are getting dumped on with what seems like endless precipitation. As the pictures can attest, the jeeps are buried.
There is some progress on the Hurricane Engine. It has been inspected, and is going to start being rebuilt. Cost is the biggest factor, but hopefully it we will soon begin the restoration process.
Subscribe to:
Posts (Atom)