Showing posts with label 1957 Willys. Show all posts
Tuesday, May 7, 2013
Monday, November 12, 2012
Rear Valance Installed!
Great stuff.
The Rear Valance is the last piece to be installed. The Rear Valance is what holds the Tailgate and the rear floor. It attaches to the rear bumper and is welded to the sides of the Willys. The welding part has not happened yet as it is being held on by clamps. But we are close.
The clamps are straightening it out. It came from the 1957 Willys and it is a bit out of shape. I had to fix it up when I took it off. So it was not perfect.
Once I get some welding in, I think the clamps could be removed. Can't wait to attach the Tailgate!
Labels:
1957 Willys,
1960 Willys,
body work,
rear of jeep,
restoration,
Salvage,
tailgate,
tub
Monday, May 28, 2012
Wakefield Willys Update 5.3
Well, my last update was in March. That does not mean work has not been completed or on going. Just not posting anything on the blog.
I have 3 projects I wanted to get done in the Spring.
Dashboard (completed, painted and waiting to be installed)
Windshield (not completed, metal pieces fabricated, still welding to be done and primed and painted.)
Rear Valence (not completed, welded and primed. Almost done)
The Rear Valence is in the picture. After some welding and fabrication of some steel pieces to reenforce the strength of the rear valence it is almost ready to be painted. The rear valence on the 1960 Willys is hardly recognizable. This is off of the 1957 Willys. Not perfect but solid.
Within the next few days, it will be painted and set aside to be installed. Progress.
I have 3 projects I wanted to get done in the Spring.
Dashboard (completed, painted and waiting to be installed)
Windshield (not completed, metal pieces fabricated, still welding to be done and primed and painted.)
Rear Valence (not completed, welded and primed. Almost done)
The Rear Valence is in the picture. After some welding and fabrication of some steel pieces to reenforce the strength of the rear valence it is almost ready to be painted. The rear valence on the 1960 Willys is hardly recognizable. This is off of the 1957 Willys. Not perfect but solid.
Within the next few days, it will be painted and set aside to be installed. Progress.
Labels:
1957 Willys,
1960 Willys,
body work,
dashboard,
restoration,
windshield
Saturday, January 7, 2012
Wakefield Willys Update 5.1
Happy New Year!
Yep it is 2012 & the CJ5 is still not done. I still have a lot of work this year and I suspect 2013 will start the same way.
Yet progress is at hand. I had salvaged the dashboard, rear valience and a corner piece from the 1957 Willys.
Salvage work is not just ripping stuff out to save, it takes a lot of work.
The dashboard is a great example. So many wires, switches and I am going to need to know how to reassemble it with new parts. It is important to make sure I catalog my work for future consideration.
The end product is in the final picture. A few more things need to be taken off, and it will be ready to be restored. Most likely sometime in the Spring.
My hope in 2012 is to have the majority of body work completed. We will see.
Yep it is 2012 & the CJ5 is still not done. I still have a lot of work this year and I suspect 2013 will start the same way.
Yet progress is at hand. I had salvaged the dashboard, rear valience and a corner piece from the 1957 Willys.
Salvage work is not just ripping stuff out to save, it takes a lot of work.
The dashboard is a great example. So many wires, switches and I am going to need to know how to reassemble it with new parts. It is important to make sure I catalog my work for future consideration.
The end product is in the final picture. A few more things need to be taken off, and it will be ready to be restored. Most likely sometime in the Spring.
My hope in 2012 is to have the majority of body work completed. We will see.
Labels:
1957 Willys,
dashboard,
restoration,
Salvage,
tub
Saturday, December 3, 2011
Saturday, November 12, 2011
Wakefield Willys Update 4.9
We are in the midst of Small Fall Projects. Already have a few knocked off which feels good.
The windshield was removed from the 1957 Willys, and unfortunately it does not look salvageable. It looks fine inside and out, but the hinge corners where completely rotten out. This is a setback, and hopefully we can find a replacement.
The aluminum top of the 1957 is also completely unbolted. I cut the last bolt and it is ready to be removed. That will make way for some more salvage work.
Other than that, we are golden. Painting for the most part has come to a complete stop. The overnight temps are not helpful. Hence the focus on salvage work.
The windshield was removed from the 1957 Willys, and unfortunately it does not look salvageable. It looks fine inside and out, but the hinge corners where completely rotten out. This is a setback, and hopefully we can find a replacement.
The aluminum top of the 1957 is also completely unbolted. I cut the last bolt and it is ready to be removed. That will make way for some more salvage work.
Other than that, we are golden. Painting for the most part has come to a complete stop. The overnight temps are not helpful. Hence the focus on salvage work.
Labels:
1957 Willys,
Alum Top,
restoration,
Salvage
Sunday, November 6, 2011
Fall / Winter Projects 2011
I mentioned in the previous post, I am changing gears with the weather and focusing on smaller projects. Projects that take one day, maybe two. Painting is optional, depending on temps.
So here is the list: (in order of priority)
windshield removal & evaluation
tailgate hinges restored
rear panel replacement found
rear valence replacement found
rear driver side corner prepped
spare tire restoration
dashboard removal
rear frame restoration
air cleaner replacement
secure battery
So here is the list: (in order of priority)
windshield removal & evaluation
tailgate hinges restored
rear panel replacement found
rear valence replacement found
rear driver side corner prepped
spare tire restoration
dashboard removal
rear frame restoration
air cleaner replacement
secure battery
Labels:
1957 Willys,
1960 Willys,
air filter,
frame,
restoration,
Salvage,
tailgate,
tub,
wheels
Thursday, May 5, 2011
Wakefield Willys Update 4.2
This update will be a surprise, as my last one mentioned getting started on body work. But I got sidetracked, in a big way.
Coolant has been leaking all winter and spring, and a few weeks ago I figure out the source. A gasket on top of the engine block above the thermostat.
Not a big deal, but the fix created more problems, and the simple fact was the cooling system was not doing it's job properly. After a change of a thermostat, and some good counsel from the Master Mechanic, the coolant system burbed up its last air bubble and is now running properly.
A major distraction from the body work, but now that it is settled, I feel a lot better.
The only progress on body work is that the top on the 1957 Willys is close to being removed.
Coolant has been leaking all winter and spring, and a few weeks ago I figure out the source. A gasket on top of the engine block above the thermostat.
Not a big deal, but the fix created more problems, and the simple fact was the cooling system was not doing it's job properly. After a change of a thermostat, and some good counsel from the Master Mechanic, the coolant system burbed up its last air bubble and is now running properly.
A major distraction from the body work, but now that it is settled, I feel a lot better.
The only progress on body work is that the top on the 1957 Willys is close to being removed.
Labels:
1957 Willys,
1960 Willys,
body work,
engine
Saturday, September 18, 2010
Wakefield Willys Update 3.16
Other than a few small jobs on the 1960 Willys, the majority of the work is on the 1957 CJ5
Salvage Work
Stripped the Front Bumper of all unnecessary steel. It is fairly close to being ready to be restored, need to take the electric lights off, and we can begin grinding and sanding the bumper down. It could really use it before Winter as there are some serious rust flakes.
Started working on the windshield. Not liking what I am seeing, but am hoping to get it off to take a better look at it and see if it is restorable.
The Rear Bumper, like the Front Bumper is going to require a lot of effort to remove. My initial work and inspection tells me it is going to take several attempts. I am going to have to take the rear tires off, jack it up as high as I can get it, and then we may need the torch. Fun times ahead!
Salvage Work
Stripped the Front Bumper of all unnecessary steel. It is fairly close to being ready to be restored, need to take the electric lights off, and we can begin grinding and sanding the bumper down. It could really use it before Winter as there are some serious rust flakes.
Started working on the windshield. Not liking what I am seeing, but am hoping to get it off to take a better look at it and see if it is restorable.
The Rear Bumper, like the Front Bumper is going to require a lot of effort to remove. My initial work and inspection tells me it is going to take several attempts. I am going to have to take the rear tires off, jack it up as high as I can get it, and then we may need the torch. Fun times ahead!
Monday, September 13, 2010
Salvage Work
It has become a very valuable resource, and for the next few weeks I have plans to remove a number of components. The rims, the front bumper are already removed.
In addition, I need to get the rear bumper off, the top removed, the dashboard and windshield all need to be taken off and stored indoors.
So for most of the Fall, we will be doing salvage work. Rust! Here we come!
Saturday, September 11, 2010
Wakefield Willys Update 3.15
From now until it gets too cold to paint / work, I am focusing on small jobs. Little projects to get me through the rest of the Fall. For now, the Jeep Tub will have to wait until the Spring. Too tired to start a major repair.
So a perfect example is pictured in this update. The 1957 Gas Station Willys had a heavy duty spare tire bracket that I thought was cool. The studs were rusted and it needed cleaned up. So I removed the studs, welded the new ones on and primed it. I will set this aside until I am ready to mount it on the Jeep.
These projects are fun, usually simple, and take a day. I spent just a few hours on this project. Not a bad way to spend part of a day.
Saturday, May 22, 2010
Wakefield Willys Update 3.5
Today was a fairly productive day.First, I tried my hand at welding in the morning, not very successful, but learning.
Secondly, worked on the passenger fender that I bought on eBay. In worse shape than I would like. Found some bondo holes and one spot that was very lumpy. Not sure what I am going to do. Might have to get some expert help.
Not done cleaning it, but made a lot of head way. Still needs more attention from the angle grinder, a little spot welding and we should be close to priming.
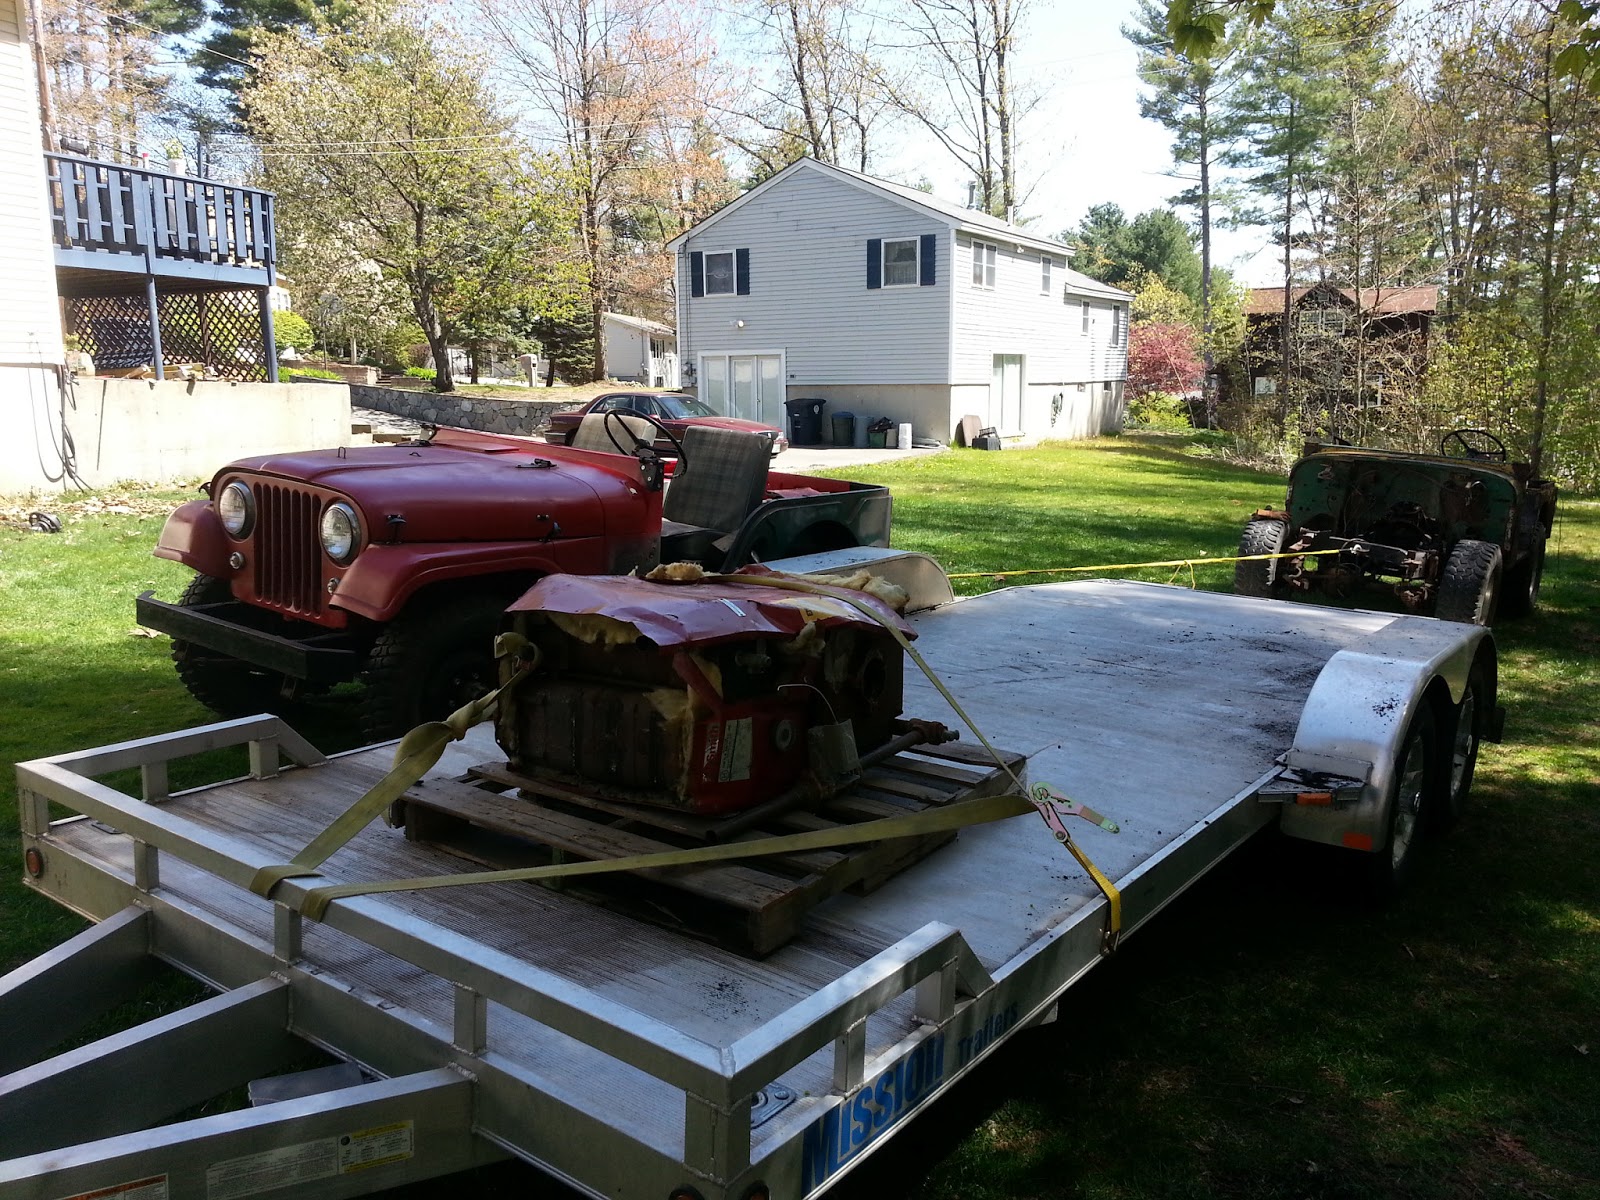
Lastly, Drew and I removed the gas tank from the 1957 Willys. That is what is in the picture, and the remaining fuel. Smelled terrible, nothing you would want to put in your car unless you wanted to destroy the engine.
This is not a standard Willys gas tank, which is usually placed under the driver seat. This gas tank was mounted on the top of the rear fender on the passenger side. I can't help but laugh. A terrible place to have a gas tank. But if you think of it, neither location is good, really tells us that back in the day, safety was not a huge priority.
Monday, April 5, 2010
Its Back......... Original Hurricane Engine
Over the weekend, the Master Mechanic was doing some online research in regards to our oil leak out of the crankcase. His research came across a service bulletin from 1960 on how to fix it. Very cool.Unfortunately, our current engine does not have the fix, so we need to do something or it will leak oil indefinitely.
Fortunately, the Original Hurricane Engine out of the 1957 Willys had the fix. But it has been at Nashua Engine Rebuilders for the last 2 years, sitting in a corner collecting dust. I decided it was time to retrieve it and bring it home. Here it is, all disassembled.
I have no need of it at this time, that is the reason it has been collecting dust. But it does have some valuable components, and is an engine that can be rebuild. I just don't have $3800+ to do it. I will probably sell it do someone who does. But for now, it will be put in storage, and will use some of its parts to improve the Hurricane Engine that is in the 1960 Willys.
Saturday, March 27, 2010
Learning Patience
Working with rusty bolts have a way of teaching patience.Drew & I have been needing to get busy on the aluminum top on the 1957 Willys Jeep. It is bolted on to the tub and we need to remove it. Eventually, it will end up on the 1960 Willys.
It is very very very well bolted on to the Jeep. So rather than using penetrating oil, we are just going to cut the bolt off with a rotary tool. Drew did an excellent job cutting the bolts. He cut, while I supervised and finish the job of removing the bolt. 8 bolts down today, and one cutting disk destroyed. More bolts are waiting to be cut.
One of the things I like about this project is how it teaches patience. I have certainly learn patience, and Drew is learning it as well. Good life lessons for father and son.
Saturday, March 6, 2010
Wakefield Willys Update 3.1
Warm weather means Willys Work. 50+ degrees today, perfect for working in the backyard.
Craftsman Tool Box Project.
Bottom Box is done, pictures in previous post. Stripped the top box, primed and started on painting. Give me a week or so, and it will be done. Glad to have this project almost done. I am thrilled to have the toolboxes, and the extra space is good for storage.
1960 Willys
Removed the Windshield Hinges, required a torch and drilling out numerous screws. Sanded a few parts, removed the hood to be prepped for painting. Removing hardware, excited to get the body work started on the Willys. Still no tailgate or fender.
1957 Willys
Removed its hood, cleaned it a bit and put it on the 1960 Willys. Just did not want to leave the engine exposed. Tried to work on removing the top, had little success. Need to get serious about removing the top.
Craftsman Tool Box Project.
Bottom Box is done, pictures in previous post. Stripped the top box, primed and started on painting. Give me a week or so, and it will be done. Glad to have this project almost done. I am thrilled to have the toolboxes, and the extra space is good for storage.
1960 Willys
Removed the Windshield Hinges, required a torch and drilling out numerous screws. Sanded a few parts, removed the hood to be prepped for painting. Removing hardware, excited to get the body work started on the Willys. Still no tailgate or fender.
1957 Willys
Removed its hood, cleaned it a bit and put it on the 1960 Willys. Just did not want to leave the engine exposed. Tried to work on removing the top, had little success. Need to get serious about removing the top.
Labels:
1957 Willys,
1960 Willys,
craftsman toolbox
Tuesday, March 2, 2010
Willys Color Contest
Here we have a close up shot of the 1957 Willys Hood. And if you look carefully, you will notice it has been painted a different color at one time.Actually, it has been painted several times. How many colors do you see? Willys are famous for this, folks tend to repaint these several times. Given it is over 50 yrs old, we should not be surprised.
We plan to strip all the paint off right down to the bare metal. My angle grinder with a certain attachment has shown it can get the job done easily.
So if you guess the right amount of paint colors, you win a free ride in the restored Willys! Whoo Hoo!
Friday, January 15, 2010
Success!
After using a torch, a high powered reciprocating saw and a sledge, the bumper finally gave up the ghost and came off.The key was a diamond blade I picked up at Lowes. Where other blades went dull and were useless in 5 minutes, the diamond blade kept going. $$$ well spent.
After getting some significant cuts, I would jack up the bumper and wail on the frame with a sledge. That tension and the previously cuts made it easy for the frame and the bumper to separate.
To say I am thrilled is an understatement. This was a major project this winter, and glad to see it off and in storage, ready to be refinished. Success indeed!

Tuesday, December 1, 2009
Restoration Process : The Dark Side
I am quickly discovering a pattern when it comes to working on this Willys => nothing is as simple as it first seems.For example......
For the last month, with the help of the Master Mechanic, we have been trying to remove the front bumper of the 1957 Willys Jeep. It is a custom fabrication job, I want to remove it, clean it up and remount it on the 1960 Willys Jeep.
Simple.
Not really.
So after using a cutting torch and a Sawzall, 2 very powerful tools the bumper is still attached to the 1957 Willys, with no end in sight. A month has gone by, and it doesn't even seem loose, or ready to give up the fight. The picture is of one of several blades that met it's end at the hands of this fabricated bumper. One thing is for certain, the people who attached this bumper had made sure it would never come off.
So what is the plan? Not sure, a stronger blade, more torch cutting perhaps. But this has reminded me that the restoration process often has these "darker sides" to it. It is not always as simple as remove, replace, refinish. Sometimes the "remove" part does not want to cooperate.
Saturday, October 31, 2009
Wakefield Willys Update 2.7
So it has been a month, a quiet month. But a few things are in the works.
Today, we (me & the master mechanic) began to cut and remove the front bumper of the 1957 Willys Jeep. We are going to cut it off with a torch and bring it inside the shelter to get it ready to be reinstalled on the 1960 Willys.
We also played with the mig welder for the first time, a key tool to getting the willys tub and misc parts up to spec. Alot of work to get it working, but it seemed to at the end doing what we wanted it to do.
Been doing some shopping looking for body parts for the Jeep. That will be a big focus of next year.
Thats about it. Project has slowed down, but not all together.
Today, we (me & the master mechanic) began to cut and remove the front bumper of the 1957 Willys Jeep. We are going to cut it off with a torch and bring it inside the shelter to get it ready to be reinstalled on the 1960 Willys.
We also played with the mig welder for the first time, a key tool to getting the willys tub and misc parts up to spec. Alot of work to get it working, but it seemed to at the end doing what we wanted it to do.
Been doing some shopping looking for body parts for the Jeep. That will be a big focus of next year.
Thats about it. Project has slowed down, but not all together.
Wednesday, September 2, 2009
Wakefield Willys Update 2.4
Just want a give a quick update.....We are in the middle of the "rim swap" Taking the rims off of the 1957 Willys, wire brushing, priming and painting black. This is to get rid of rust, as well as preserve the original rims.
Then we put them on the 1960 Willys and put the "mudders" on the 1957. If your confused, sorry. You will understand when we are all done.
I have been hand wire brushing, which is fine. Sometimes to get in tight spots, it is your only choice. For the rest, I used a drill with a wirebrush attachment. Worked fine, and did one set of rims this way.
But for a few $$ at the Hardware store, I picked up this wire brush attachment for the angle grinder. This is soooooooo cool. And easy to use, way easier. And it really does a good job getting the old paint off. Look at the picture, that rim used to be green and yellow. And I barely did anything! Very slick.
Subscribe to:
Posts (Atom)