Showing posts with label 1960 Willys. Show all posts

Sunday, March 8, 2015

Wakefield Willys Update 8.2

So it has been a month, an update is needed.

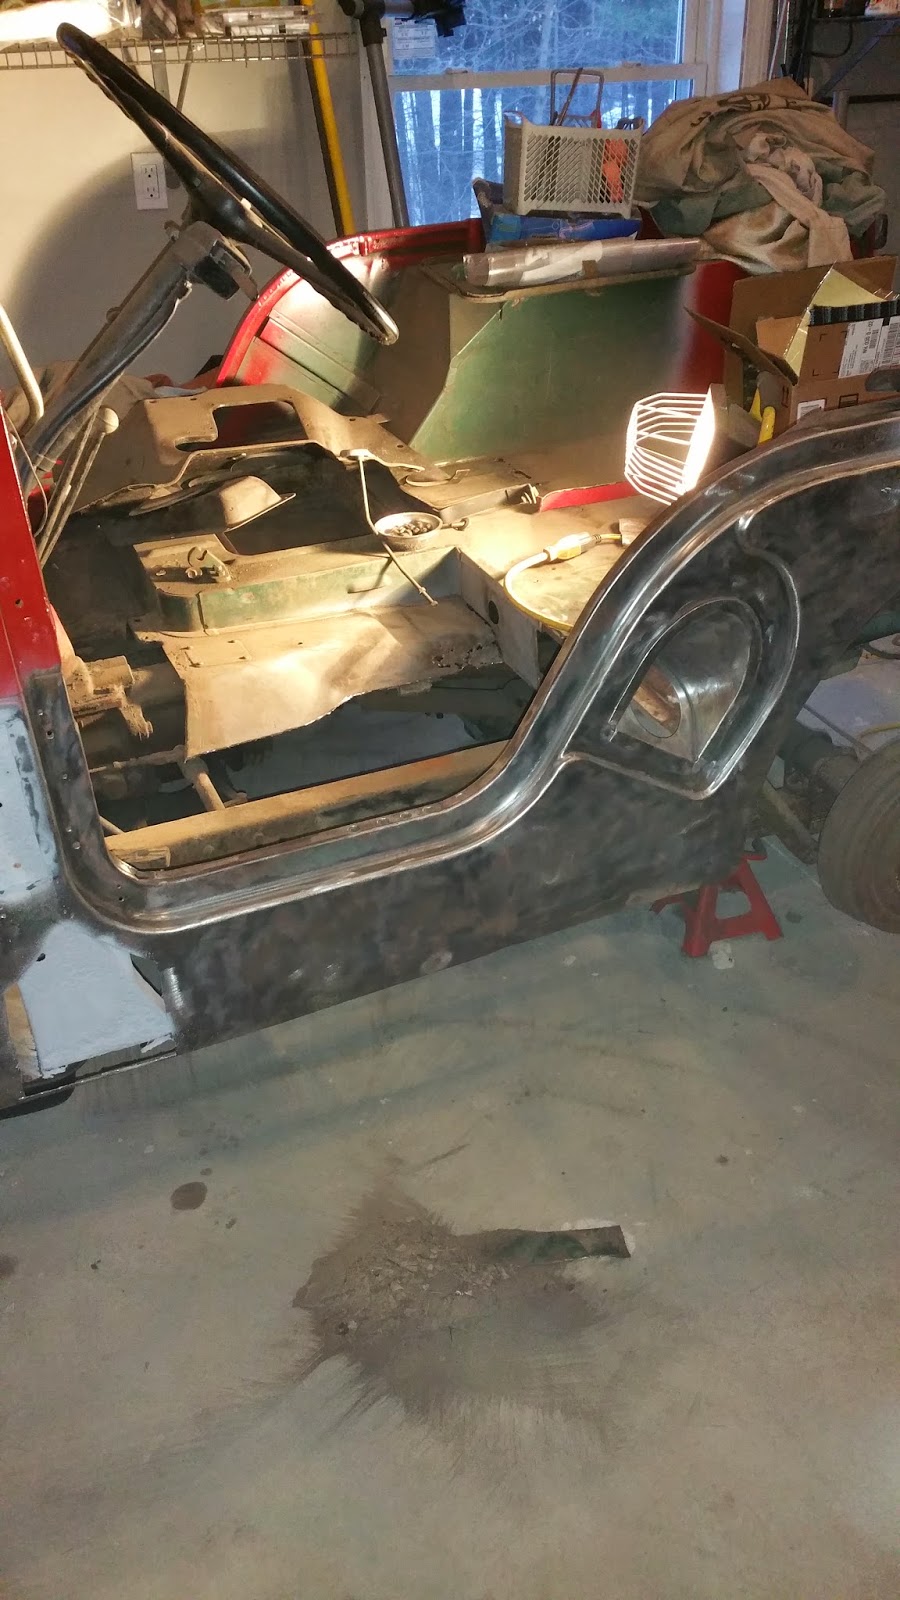
More rust has been removed and we are getting closer to full restoration.  I am almost done cutting away the bad stuff and ready to do repair work.  At this point, old paint needs to be removed and a few rust spots cut out.  But we are at that turning point of rebuilding the body.  In fact we already have done some welding and rebuilding.

I probably should have done a frame off restoration, but I am trying to do this on the cheap.  Well even though I have not done a frame off restoration, I am doing a hybrid version of it.  By removing a large section of the floor, I can get to the frame easily.  I have cleaned it and painted it with this undercoating rubberized black paint.  You can see the newly painted frame in the first photo. 

Sitting on top of it is the new floor supports from Classic Enterprises.  It looks good and I am looking forward to welding that into place, but I need to address the gap between the new floor support and the existing floor support.


Saturday, February 7, 2015

Wakefield Willys Update 8.1

So it has been 2 months since I have posted, but work has been steadily been getting done.  Since my last update, I have been patching and welding rust spots on the Jeep Tub.  It sometimes feels like I fix one spot, and 5 more previously unknown problems appear.

The biggest shock was the floor panels.  I knew they were bad, but I thought I could patch it like others had done before.  Boy I was wrong, they needed to be cut out and replaced.

Today, I cut out the driver side floor panel.  It went well.  The frame looks good, thanks to the caked on Pennsylvania Clay.  When I went underneath to inspect the floor, I was stunned to find wood supports.  They are original, from the factory.  They will be taken out and replaced with steel.

The replacement panels come from Classic Enterprises.  They look great, and hope to put the first one in with floor supports very soon.


Saturday, December 6, 2014

Wakefield Willys Update 7.2

So I am hoping to get the Willys on the road in 2015.  And days like today tell me it is not going to happen.  Let me explain.

In repairing the tub, I want to fill in all of the holes in the tub from someone drilling into it to attach a top.  And there are a lot of holes.  It is tedious work.  Prep the hole, weld. grind, and then maybe weld again, then grind.  It takes hours to do this work.  In the pictures you can see the process, the holes, the welds and the grinding.  I like doing it, but it takes a lot of time.


Friday, November 14, 2014

Wakefield Willys Update 7.1

So it has been over 2 years since I have created an update.  And that means that for 2 years little work  has been done to the 1960 Willys Jeep.  The main reason for the lapse, is that we just completed major home renovations.  And that included building a garage.  So now, we can for the first time work on the Willys Jeep in the Winter.

So I have set a goal of having the Willys on the road by the summer of 2015.  And I have a lot of work to do.  First up, is the restoration of the driver side of the Jeep.  In the pictures you have the beginning work of removing the paint, and cutting out the bad panels.  


Friday, November 16, 2012

Compare & Contrast : Rear of the Willys


Annual Fall Wrap Up


Every Autumn I wind things down with the Willys as Winter approaches.  To cold to work on the Jeep, and most of the work is body work which does not get done when the temps are under 50F.  So winter brings a break.

So here is where we are, Fall 2012

Monday, November 12, 2012

Rear Valance Installed!


Great stuff.

The Rear Valance is the last piece to be installed.  The Rear Valance is what holds the Tailgate and the rear floor.  It attaches to the rear bumper and is welded to the sides of the Willys.  The welding part has not happened yet as it is being held on by clamps.  But we are close.

The clamps are straightening it out.  It came from the 1957 Willys and it is a bit out of shape.  I had to fix it up when I took it off.  So it was not perfect. 

Once I get some welding in, I think the clamps could be removed.  Can't wait to attach the Tailgate! 

Friday, November 2, 2012

Wakefield Willys 5.13

Very exciting.  Rear Panels are installed.  Needs some spot welding, but they are bolted in.

The plan to get them in changed last minute.  The rear side panels have been sagging probably for decades.  Common problem on pickups, rust eventually causes the rear side panels to fall apart and lean outward.

To correct this, I was going to weld them to the rear panels, but that is a lot of pressure.  So I drilled holes and bolted them together slowly.  This is correcting the problem and bringing it back together.

I think it is looking much much better.  Now for the rear valence!


Rear Panels Being Installed


Saturday, October 27, 2012

Wakefield Willys Update 5.12


Progress, and new challenges.

The frame is painted, the rear of the willys is painted.  It is time to assemble the 3 remaining pieces of the jeep.  2 rear panels, and the rear valence with the tailgate.  I wish it was as easy as bolting them to the rear bumper, but it is not.

If you look closely at the rear panel attached and the rear corner they don't match up.  Not surprising considering the age of the tub and it has probably been sagging for decades.

So what to do?  See the engine crane lying there in the background.  I think it maybe time to reassemble it and use it to lift of the rear corner.  I might have to do it on both corners, I am fairly certain both sides will need some help.

So I am going to attach the other rear panel and see how bad it is, and then probably decide to erect the engine crane.  Exciting times, glad the tools are here to work with.

Monday, October 15, 2012

Wakefield Willys Update 5.11


With cold weather approaching, painting gets more difficult.  So taking advantage of a mild day, I cleaned, painted and rubberized the rear portion of the willys jeep.  The frame, the rear bumper are all cleaned up and drying as we speak.

Feels good to be done with this, now on to the floor, rear panels and rear valence.  Yikes! We are close to being done!


Saturday, October 6, 2012

Wakefield Willys Update 5.10

 Slow but steady.

As you can see by the first picture, the replacement pieces are welded in over the rear right fender.  I am not done, I need to do some grinding and go over with the welder one more time.  Then grind again and then we might be ready to paint.

To weld and get ready to move on to other parts of the rear restoration.  I removed the tires so I can get into to weld and clean up the under portion on the rear of the tub.

Did quite a bit of cleaning the frame today, but still a long long way to go.

Once the underneath is cleaned and painted, I will get back to putting the rear panels back on and finishing up the rear.

Can't wait to see this finished.  Should look great.


Saturday, September 29, 2012

Willys Wakefield Update 5.9

Still working on the Right Rear.

This was not on the list of fixing up the rear.  But as I was working back there I found holes that were not easily repairable.

So in the picture you can see what I have done.  Cut the bad steel out and plan to weld in a new piece.

The new pieces are fabricated, just waiting for another day to get the new pieces in.

I was able to work on the rear bumper, the rear left and clean up some parts.

A lot of work, but not much to show for it.  Hoping that will change before the snow flies. 

Saturday, September 15, 2012

Wakefield Willys Update 5.8

The work continues..... slowly.

Yes, recently weeks have not been good for the willys project.  Got a few hours in today however.

What takes so much time are little projects like this. 

Drilling holes for the lights and hooks.  Sounds simple, but it takes precision, careful planning and then finally execution.

What was important in this step was the scrap bucket pictured towards the right of the 2 rear panels.  In there are the scrap parts that let me know where to drill.  I could have easily thrown them away but I didn't.  And boy, I am glad I didn't, made this job easier.

At the end of the day, I drilled a few hole and cleaned some parts up.  But it took hours, not minutes.  And that is why sometimes it feels like it is going so slow.


Saturday, August 18, 2012

Wakefield Willys Update 5.7

I have been fairly preoccupied with other projects, and taking some vacation time with the family.  As nice as it is outside, I have not put much time into the Jeep this summer.

Well, I got to spend a few hours on it today, and have pretty much did all the demolish work on the rear of the Willys.  Here it is, ready to start the restoration process.

I think I need some sheet metal from the donor jeep and we will be cleaning the rear of this jeep up soon!


Friday, July 20, 2012

Foiled by my own Handiwork!


This is kinda funny.

See that small grey primer piece of steel?   It is not suppose to be there.

So as I was tearing apart the rear of the jeep, I was getting frustrated.  Why is this corner not coming apart?  It was acting like it was reenforced.  How is that possible?

So as I was able to see inside the right rear corner, and I see this grey L shaped piece of steel welded into the corner.  And then I remembered, I put it there!

Last year when finishing up on the passenger side, I saw some rot in that rear corner and thought I would take care of that by welding a nice strong piece of steel in there.

Fast forward to today, and I am cutting and cutting and getting no where.  I had to laugh.  Foiled by my own handiwork!


Wakefield Willys Update 5.6

Just a quick update.


These 2 rear panels came in from Classic Enterprises, and I am prepping them for installation.  I cleaned them, and will prime them, paint them and set them aside.


Here is the progress on the rear of the jeep, this is going to take a while......


Saturday, June 23, 2012

Rear of the Jeep


These pictures are mainly so I can remember how bad it looked.

This summer, I hope to finally fix the worst part of the Jeep, the rear.  As you can see from the pictures, it looks terrible.  Dents, holes, rust, everything that makes this project a project is located in the rear.  

The driver side is not that bad.  It is not as bad as the passenger side was.  So that does not concern me.  The real work is like I said, the rear of the Jeep.

Here is just a partial list of things I have to do:

Remove rear valence, remove both rear panels, clean and paint the frame, repair a corner, fix the rear floor and replace a post.  And that is just the salvage part.  I have not included the rebuilding part.

I think once this hurtle is crossed, the Jeep is really going to come together.  I say that because from the front, it looks decent.  From the rear, it looks like this.  Once this is completed, both ends of the jeep will look solid.  Right now, the rear looks more like Swiss cheese.

Stay tuned, once I set aside the windshield, full steam ahead with the rear of the jeep!


Friday, June 15, 2012

Replacement Tailgate Assembly!


To steal a line from the A-Team, I love it when a plan comes together!

If you have seen the rear of the 1960 Willys, it is rotted out and the worst of the body work.  This summer I hope to finally fix it.  The Replacement Tailgate Assembly is pictured and it looks great.  Fits together and is completed.  Once I get the new rear panels, I will paint them and begin tearing out the old rear portion of the Jeep.  Progress!


Saturday, June 2, 2012

Wakefield Willys Update 5.4

I mentioned 3 projects for the Spring, and we are almost done.

Dashboard => Done
Rear Valence => Done

Windshield is the last one and most complicated.  I need to replace the top of the windshield and it has been the most difficult fabrication of this entire willys project.

The steel piece is cresent in shape, the only flat endges are on the side.  Very hard to cut, very hard to measure and develop.  But in the picture you can see it is finally in place, and ready to be welded to the windshield.

The funny thing is.  I started with this project, but got frustrated so I worked on the other 2 which were easier.  So now I have no choice, got to get it finished.